
Achieving a truly sophisticated, lit-from-within glow has very little to do with the amount of shimmer in your product and everything to do with the precision of your application. If you have ever struggled with how to use cream highlighter stick products only to find them lifting your foundation or leaving a harsh stripe of glitter, you aren't alone. It's a common frustration that can make even the most premium products feel unapproachable. Refined. Seamless. Radiant.
We understand that you want a finish that looks like skin, not like makeup. In this guide, you'll master the professional techniques required to create a seamless, dewy effect that enhances your natural bone structure. We'll cover how to prevent patchiness and ensure your glow remains luminous throughout the day. By understanding the synergy between high-performance skin prep and the specific density of your tools, you'll gain the confidence to sculpt a refined, lifted aesthetic. We'll explore strategic placement, the importance of starting with a hydrated base, and how the right brush can transform your routine into a bespoke beauty experience.
Key Takeaways
- Learn why high-performance hydration is the foundation for a luminous, dewy finish that prevents your base makeup from lifting.
- Discover the professional 'Warm and Buff' method to master how to use cream highlighter stick products for a seamless, second-skin glow.
- Understand why synthetic fibres and specific brush densities are essential for blending creams effectively without absorbing the pigment.
- Identify the strategic high points of your unique bone structure to achieve an instant, sophisticated 'C-shape' lifting effect.
- Explore the professional standard for cream application using expertly designed tools from our 33-piece brush collection.
Why the Cream Highlighter Stick is the Modern Artist's Choice
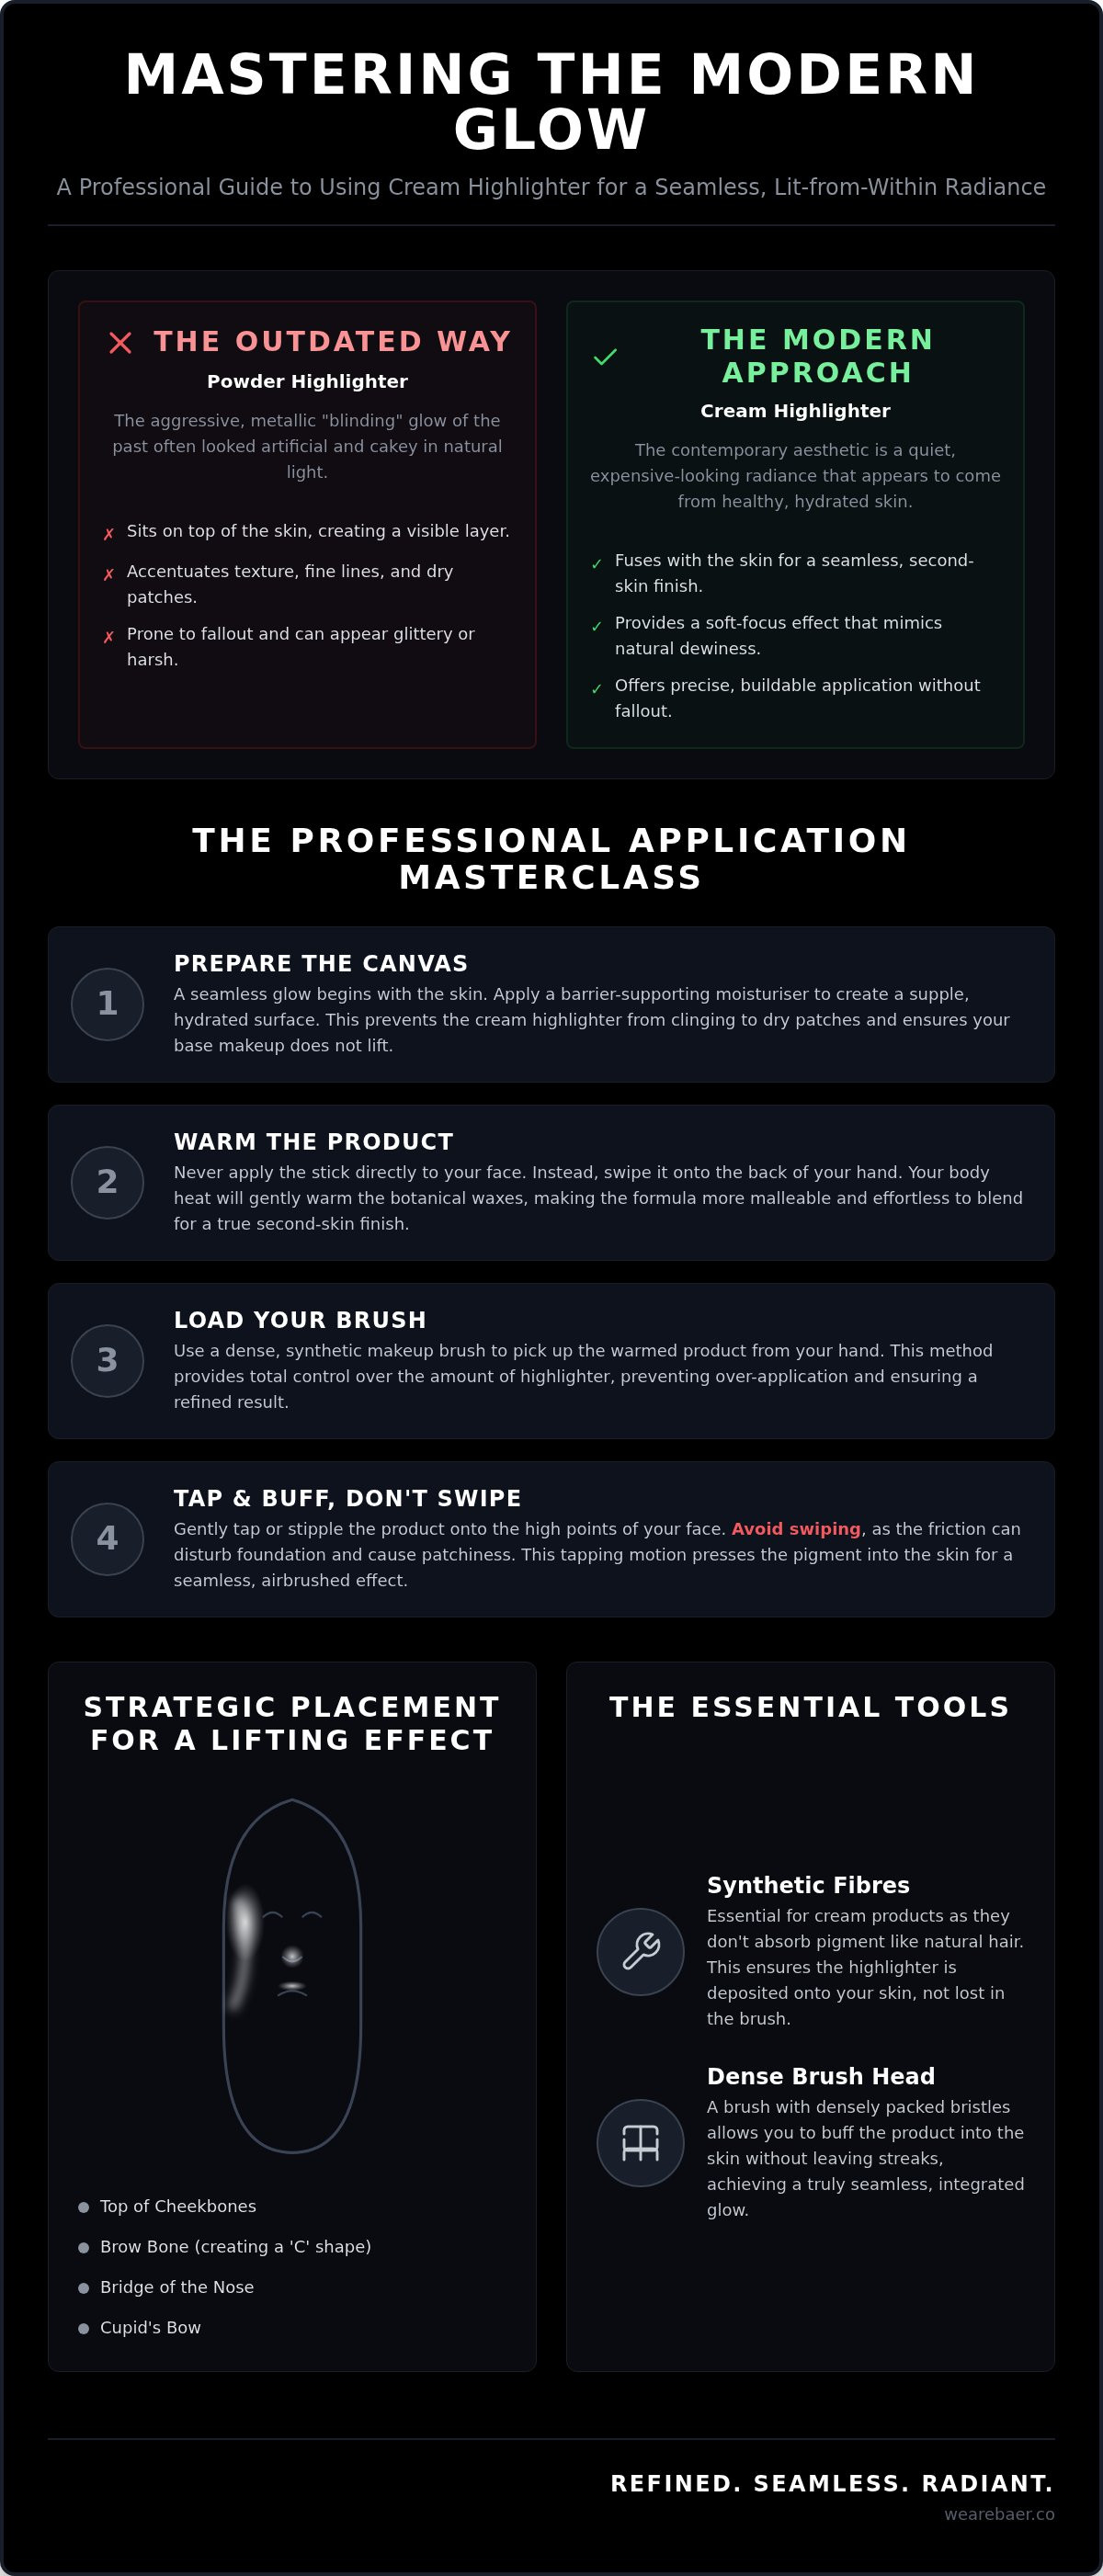
The evolution of Highlighter (cosmetics) has moved decisively away from the aggressive, metallic finishes of 2016. In that era, the goal was a 'blinding' glow that often looked artificial in daylight. Today, the aesthetic has shifted towards a quiet, lit-from-within radiance. Cream sticks have become the preferred medium for this modern look because they offer a tactile, emollient quality that powders cannot replicate. They don't just sit on the surface; they fuse with the skin's natural lipids to create an expensive, dewy finish. It is about health. It is about hydration. It is about a refined, polished glow.
Stick formats provide unparalleled control and portability for a modern lifestyle. You aren't dealing with fallout or a cloud of pigment that settles into fine lines. Instead, you have a concentrated dose of light that can be placed with surgical precision. There is a persistent myth that creams lack staying power, yet high-performance formulations like the 19/99 BEAUTY Cream Highlight Stick are designed with specific waxes that set without losing their lustre. When you master how to use cream highlighter stick formulas, you'll find they often outlast powders by remaining flexible. They move with your face rather than cracking as the day progresses.
Cream vs. Powder: The Texture Debate
Powders often accentuate texture, making them a difficult choice for dry or mature complexions. Creams are restorative. They integrate with the base to provide a soft-focus effect that mimics the skin's healthy hydration. Professional artists gravitate towards this medium for editorial work because it looks believable under any lighting. It's the difference between a stripe of glitter and a genuine, healthy glow. By mimicking the skin's natural lipid structure, these formulas enhance your architecture without masking it.
Common Pitfalls in Cream Application
Even with the best products, application remains the deciding factor. Sliding a stick directly across your cheekbones often leads to the 'lifting' effect, where the friction disturbs your foundation underneath. This results in patchiness and a compromised base. Similarly, relying solely on your fingertips can lead to uneven distribution or over-application. The goal is a curated dewiness, not a greasy sheen. Understanding how to use cream highlighter stick products effectively requires a shift in technique, moving away from direct friction towards a more considered, layered approach. Precision is the key to a sophisticated finish.
The Professional Application Masterclass: Step-by-Step
Mastering how to use cream highlighter stick products requires a departure from the 'swipe and hope' mentality. A truly sophisticated glow is the result of strategic layering and deliberate placement. It is a process that prioritises the integrity of the skin. By following a professional methodology, you can ensure your radiance looks inherent to your complexion rather than an afterthought applied on top. Precision is your most valuable asset.
Skin Prep: The Foundation of Glow
The secret to a seamless finish lies in the canvas. To prevent the 'lifting' effect mentioned previously, you must ensure the skin is deeply hydrated and primed for adhesion. Begin with a barrier-supporting moisturiser like MANTLE The Barrier Cream to create a supple, smooth surface. If you struggle with texture or excess oil, follow with the Danessa Myricks Water Powder Serum. This creates a soft-focus base that remains slightly 'tacky', providing the perfect bond for cream-to-cream application. Your base should feel like a second skin, ready to receive light.
The 'Warm and Buff' Technique
Never apply the stick directly to your face if you want a professional result. Instead, swipe the 19/99 Beauty Highlight Stick onto the back of your hand first. The warmth of your skin melts the botanical waxes, making the formula more malleable. Use a dense, synthetic brush to pick up the product from your hand. This allows you to control the exact amount of pigment. When considering how to use cream highlighter stick formulas for an airbrushed finish, use a gentle tapping motion. Avoid swiping, as this creates friction that can disturb the foundation underneath.
Once the brush is loaded, identify where the light naturally hits your bone structure. For a comprehensive overview of placement, you might refer to this step-by-step guide to applying cream highlighter, which highlights the importance of the high points. Focus on the tops of the cheekbones, the brow bone, and the bridge of the nose. Blending is the final, crucial step. Use a clean portion of your brush to buff the edges until they disappear. If you must set your face, use a translucent powder only on the areas where you don't want shine, such as the sides of the nose. This preserves the luminous 'wet' look on the high points. To achieve this level of precision at home, many clients rely on our expertly curated 33-piece brush collection to navigate every contour with ease.
Choosing the Right Tools: A Buying Guide for Make-up Brushes
While many suggest using fingertips, a professional finish requires a dedicated tool. Fingers often lack the precision and buffing capability of a high-quality brush. If you're learning how to use cream highlighter stick formulas, the choice of bristle is paramount. Synthetic fibres are non-negotiable. Natural hair is porous; it absorbs the emollient oils and waxes, leading to wasted product and a patchy application. High-performance synthetic bristles, like those found in our 33-piece collection, are designed to hold the product on the surface. This ensures every drop of pigment is transferred directly to your skin for a curated, expensive-looking glow.
Density is the key to control. A brush with too much 'give' will simply smear the cream, whereas a brush with the correct 'snap' allows you to buff the edges into a soft-focus haze. The goal is to move the product without disturbing the base layers you've already applied. Using professional tools also ensures a more hygienic application. You avoid transferring oils or bacteria from your hands to your face, preserving both your skin health and the longevity of your makeup. It's a cleaner, more efficient way to work.
The Tapered Highlight Brush vs. The Dense Buffer
Precision placement requires a tapered brush. This shape is ideal for the brow bone or Cupid's bow, where you want a concentrated beam of light. Conversely, a dense, domed buffer is your best ally for the cheekbones. It allows for a seamless integration that makes the glow look like it's radiating from within. Identifying the correct density is essential when refining how to use cream highlighter stick products for a sophisticated finish. The right tool does the work for you.
Maintaining Your Professional Tools
Dirty brushes are the enemy of a dewy glow. Residual product can harden, causing the bristles to become stiff and abrasive over time. This not only compromises the application but can also lead to breakouts. We recommend deep-cleaning your brushes every week to maintain their shape and efficacy. Store them in a cool, dry place away from direct sunlight to protect the integrity of the bristles. Investing in professional-grade tools is only the first step; caring for them ensures they remain a staple of your routine for years. To achieve this standard of artistry, explore our expertly curated 33-piece brush collection, designed specifically for modern, high-performance textures.
Strategic Placement: Where to Apply for a Lifting Effect
Strategic placement is the bridge between a simple shimmer and a structural lift. While generic tutorials often suggest a one-size-fits-all approach, professional artistry demands a more bespoke understanding of your unique bone structure. The 'High-Point' Rule is your most reliable guide. By observing your reflection under a single light source, you can identify precisely where the light naturally catches your skin. Mastering how to use cream highlighter stick products involves accentuating these specific peaks to create a three-dimensional effect that feels entirely organic. It is about enhancement, not transformation.
The 'C-Shape' lift is a signature technique for achieving an instant, rejuvenated appearance. By connecting the highest point of the brow bone to the top of the temple in a soft, sweeping motion, you create a visual lift that opens the eye area. Beyond the cheekbones, consider the 'secret' spots that define a youthful look. A minute amount of product in the inner corner of the eye and the centre of the eyelid can make you appear rested and alert. These subtle touches are what distinguish a professional application from a standard routine. They provide a quiet confidence to the overall aesthetic.
Sculpting with Light
Highlighter is a tool for manipulation. It pulls features forward, making them appear more prominent and defined. For everyday natural light, the goal is a soft-focus glow that disappears when you turn your head. This differs significantly from photography-focused application, which requires more intensity to register on camera. To maintain a sophisticated finish, avoid the T-zone entirely. Placing emollient products on the centre of the forehead or the chin often mimics the appearance of excess oil rather than healthy radiance. Focus your efforts on the outer periphery of the face to maintain a polished skin finish.
Multi-Dimensional Layering
To achieve a truly bespoke radiance, consider layering your highlight with a cream blush. This creates a 'glow-from-within' flush where the colour and light seem to merge. You can also layer different shades of highlight; use a warmer tone on the lower cheekbone and a cooler, brighter tone on the very peak to create depth and movement. Diffusion is essential here. Using professional BÆR. Makeup Brushes ensures that the edges between these different cream products are completely invisible. For those ready to elevate their artistry with the same tools used by industry experts, explore our full range of professional makeup brushes to achieve a flawless, seamless blend.
The BÆR. Edit: Essential Brushes for Your Glow Routine
Selecting the correct tools is the final step in elevating your routine from a standard application to a professional-grade finish. Our curated 33-piece collection was designed to meet the demands of high-performance artistry, ensuring that every texture is handled with precision. When you are mastering how to use cream highlighter stick products, three specific shapes become indispensable. They are the architects of your radiance. Precision matters. Quality is paramount.
The 'Glow Specialist' is our favourite tapered highlighter brush. Its slender, pointed tip allows for surgical accuracy on the brow bone and Cupid’s bow, ensuring light is only placed where you intend. For the cheekbones, the 'Seamless Finisher'—a duo-fibre or large fan brush—is essential. It provides a whisper-light touch that buffs the product into the skin without disturbing the base. These tools ensure that your 'expensive' skin finish remains intact from morning until evening. By curating a bespoke kit of these three essentials, you ensure your application is always controlled and never heavy-handed.
Spotlight on the Collection
Every brush in our range is a testament to quality, featuring high-performance synthetic fibres that mimic the 'grab' of natural hair without the porosity. The handles are weighted for balance, providing the steady hand required for detailed work. This attention to detail has made our tools a favourite amongst professional makeup artists across the UK who value longevity and precision. You can browse the full BÆR. Makeup Brushes collection to discover the specific implements that will transform your daily ritual into an act of artistry.
Final Professional Tips
To further refine how to use cream highlighter stick formulas, try the 'mist' trick. Lightly dampen your brush with a setting spray before picking up the product from your hand. This enhances the 'wet' look and increases the adhesion of the emollient waxes. If your glow begins to fade during the day, don't simply reapply more product. Instead, use a clean, dense brush to gently buff the existing highlight. This reactivates the product and restores luminosity without adding unnecessary bulk. We encourage you to experiment with these minimalist techniques. High-performance artistry is about doing more with less, using quality tools to reveal your most radiant self. It is a bespoke approach to beauty that prioritises the individual over the trend.
Elevate Your Everyday Radiance
Achieving a sophisticated, dewy glow is an exercise in restraint and precision. By prioritising high-performance skin prep and mastering the 'warm and buff' technique, you ensure your radiance remains seamless and skin-like throughout the day. Strategic placement on the high points of your bone structure provides a natural lift that enhances your architecture without the need for heavy powders. It is a refined approach to modern beauty.
Mastering how to use cream highlighter stick products is ultimately about the relationship between the formula and the tool. Our expertly curated 33-piece collection features professional-grade synthetic fibres designed to handle emollient textures with absolute control. Whether you're seeking a subtle daytime shimmer or a more pronounced editorial finish, the right brush makes the transformation effortless. We provide national delivery across the UK to bring these professional standards directly to your vanity.
Explore the professional BÆR. Makeup Brushes collection to perfect your glow and discover the difference that bespoke tools can make to your daily ritual. Your most radiant self is just a precise application away.
Frequently Asked Questions
Do you apply cream highlighter stick before or after foundation?
You should generally apply your cream highlighter after foundation to ensure the light-reflecting pigments remain on the surface. This creates a curated, luminous finish that defines the cheekbones. However, for a more subtle, 'under-lit' effect, some artists apply it before a sheer tint. This allows the radiance to glow through the base. Always ensure your foundation is still slightly tacky to facilitate a seamless cream-to-cream bond.
Can you use a cream highlighter stick over setting powder?
It's best to avoid applying cream products over setting powder, as this often leads to a patchy, textured finish. The emollient waxes in the stick can grab onto the dry particles, causing the makeup underneath to lift or roll. If you must set your face, apply the highlighter first and then use a translucent powder selectively on the T-zone. This leaves the high points of the face luminous and untouched.
What is the best way to blend a cream highlighter stick for a natural look?
When considering how to use cream highlighter stick products for a seamless finish, the most effective method involves a gentle tapping motion. Using a dense, synthetic brush from a professional collection allows you to buff the edges until they disappear into the skin. This technique ensures the product integrates with your foundation without creating harsh lines. You achieve a soft-focus radiance that mimics the skin's natural healthy lustre.
How do I choose the right shade of cream highlighter for my skin tone?
Your choice should be guided by your skin's natural undertone. Fair complexions often benefit from pearl or champagne hues that provide a cool, crisp glow. Medium skin tones are beautifully enhanced by rose gold or soft peach shades, whilst deeper complexions look most sophisticated with rich bronze or copper tones. The goal is to find a shade that mimics the colour of light reflecting off your skin, avoiding any ashy cast.
Will a cream highlighter stick make my oily skin look worse?
A cream highlighter won't necessarily exacerbate oily skin if you are strategic with your placement. Avoid the T-zone and focus exclusively on the outer periphery of the face, such as the temples and upper cheekbones. Utilising a blurring primer beforehand helps control excess sebum. This allows you to enjoy a dewy finish on the high points whilst maintaining a polished, matte appearance elsewhere. It's about balance and skin preparation.
How do I stop my cream highlighter from lifting my foundation?
To prevent your foundation from lifting, you must avoid applying the stick directly to your face. Mastering how to use cream highlighter stick formulas requires warming the product on the back of your hand first. Pick up the melted cream with a synthetic brush and tap it onto the skin. This reduces friction and ensures the base layers remain undisturbed. It's the friction of the stick itself that typically causes displacement.
Do I really need a brush to apply a highlighter stick?
Whilst fingertips are a common suggestion, a professional brush provides superior precision and a more hygienic application. Brushes allow you to control the density of the product and blend edges with a level of detail that fingers cannot achieve. A dedicated tool from an expertly curated 33-piece collection ensures that the cream is buffed into the skin for an 'expensive' finish. It also prevents transferring natural oils to your face.
How can I make my cream highlighter last all day in the UK climate?
Longevity in the UK's humid or variable climate depends on proper skin preparation. Starting with a high-performance barrier cream ensures a smooth, adhesive base. You can also utilise the 'mist' trick by dampening your application brush with a setting spray before picking up the highlight. This locks the emollient waxes in place without dulling the dewy finish. It creates a resilient, luminous look that withstands the elements whilst remaining fresh and breathable.